Sampling steps is the number of iterations that Stable Diffusion runs to go from random noise to a recognizable image based on the text prompt. As an extremely general rule of thumb, the higher the sampling steps, the more detail you will add to your image at the cost of longer processing time. However, what the optimal number of sampling steps for you and the output image you’re trying to generate is dependent on many variables, which this guide will discuss in more detail.
What are Sampling Steps?
Stable Diffusion uses an algorithm that first generates an image of seemingly random noise based on a seed number (find out more about this process in my guide about seeds). From that initial image of random noise, it tries to recognize objects, patterns, colors, etc that match the text prompt and refines the image a little bit. It then runs through that recognition process again. And again. And again. Eventually, with sufficient iterations, Stable Diffusion will get to an image that our human eyes can recognize. Each time Stable Diffusion does this is a sampling step. This process is demonstrated with the below series of images using the Euler A sampler method with CFG scale set to 10.

Issues with Higher Sampling Step Values
Based on the above, you may be tempted to simply crank up the number of sampling steps to a very high value, thinking that more steps will result in more detail and higher output image quality. Unfortunately, that is not necessarily the case. There are a few factors you must consider when setting the sampling step value:
- Higher sampling steps will result in a higher processing time per image
- Generating images with a high number of sampling steps may also require higher processing power and VRAM, which are tied directly to the specs of the graphics card (GPU) in your system.
- At a certain threshold, the amount of detail added to an image peaks and additional sampling steps past this value can actually degrade the quality of the image rather than improve it.
We’ll return to our lion image to demonstrate this last point. Keeping all other parameters the same, we can see that Stable Diffusion continues to add detail to the image up until about 80 sampling steps. As the sampling step count continues to increase, you start loosing definition, which you can see in the lion’s fur. At 150 sampling steps, the color saturation in the output image has also gone way up.

Optimizing Sampling Steps and Reducing Processing Time
Since sampling steps have a direct relationship with processing time, you may be interested in how to minimize them while still getting the output image quality and detail you want. Reducing processing time is particularly important if you are using a service that charges per sampling step or for GPU rental. So here are some basic workflow tricks to help you keep your processing times down:
- Start with low steps, then increase them. For your initial generations, use a low step count, like 20, just to see if your text prompt and seed will bring back an image composition close to what you want. Once you confirm you have a prompt and seed that you like, then you can increase the step count to start adding more detail in the image
- Generate a smaller image, then upscale. In addition to sampling steps, the other major driver of processing time is the output image height and width. Let’s say you want your final image size to be 2048 x 2048. To reduce processing time or allow you more sampling steps within the same processing time, you can do your image generations with an image that is 512 x 512. Once you have a result you like, you can then upscale it by 4x to 2048 x 2048, either within Stable Diffusion or with a free third-party upscaler.
- Optimize your text prompt. One can argue that above a certain sampling step value, the image output doesn’t necessarily degrade, but simply becomes different variations of the same composition. In the example above with the lion, you may actually prefer the highly saturated, cartoony look of the lion with 150 steps over the more detailed lions produced in the 60-80 step range. Rather than achieving that look with a high step count, try to achieve it by adding keywords to the text prompt. For ideas on how to do that, you can check out my article on how to add more color and saturation to images using text prompts.
- Reduce the CFG scale. This setting controls how closely Stable Diffusion should follow the text prompt. Many users make the mistake of cranking up CFG to give them more control over the output image. While that may be so up to a point, CFG is also known to degrade output image quality at higher values. To better understand CFG and optimize it, check out my article about CFG.
- Try a different sampler method. Different sampler methods work better or worse at different sampling step counts. For example, UniPC and DPM++ 2M Karras can return decent image results with sampling steps as low as 5, whereas DDIM generally needs at least 10 steps to return an undistorted image.
Sampling Steps in the Stable Diffusion Web UI
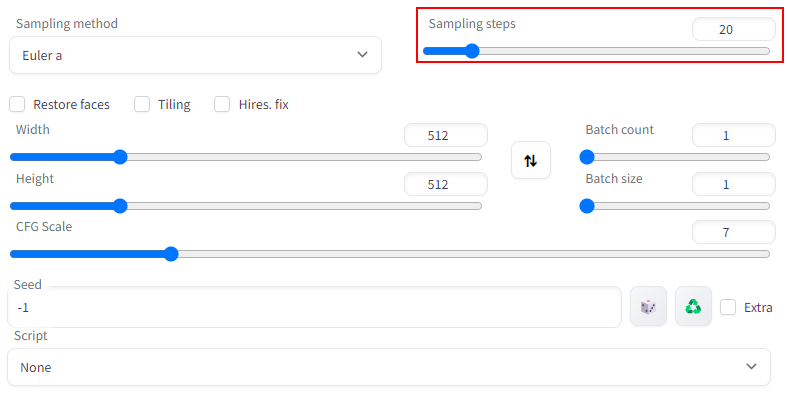
The default value in the Stable Diffusion Web UI is 20, with a minimum of 1 and a maximum of 150. This setting appears in both the text-to-image (txt2img) and image-to-image (img2img) tabs.

Start Playing With Sampling Steps in Stable Diffusion
If you want use Stable Diffusion and see how adjusting sampling steps can improve your AI generated images, here are a few options to get you quickly started without having to download and install it yourself:
- Play with a free online demo of the full Stable Diffusion Web UI.
- Run your own instance of Stable Diffusion on a GPU cloud with minimal setup at RunPod.io.


