In my experience, Stable Diffusion can really struggle if you specify too many unique elements in a single prompt. The best way to get around this limitation is through the use of inpainting. For this guide, I am going to walk through the process of how I produced one of the images for my original short story, One Drop in the Ocean.
Step 1: Get the Stable Diffusion Web UI
This tutorial assumes you are using the Stable Diffusion Web UI. If you don’t have that, then you have a couple options for getting it:
Option 1: Download AUTOMATIC1111’s Stable Diffusion WebUI by following the instructions for your GPU and platform…
- Installation instructions for Windows (NVIDIA GPU)
- Installation instructions for Windows (AMD GPU)
- Installation for Linux
Option 2: Use a pre-made template of Stable Diffusion WebUI on a configurable online service. I’ve written an article comparing different services and the advantages of using Stable Diffusion AUTOMATIC1111 v1.5 and v2.1 on RunPod.io.
Option 3: You can demo the Stable Diffusion WebUI for free on websites such as StableDiffusion.fr.
This tutorial and its screenshots were taken using RunPod.io, but the process still applies if you have the SD WebUI on your local hardware as well.
Step 2: Get an Input Image to Feed into InPaint
If you already have an image that you want to modify or add detail to that you’ve gotten from some other source, great! However, if you are creating an image completely from scratch, then you can use Stable Diffusion’s txt2img to get you started.
The first step is making the overall scene. I chose the initial composition by running a large batch of 16 images at 20 steps using the DDIM sampling method to effectively brainstorm a bunch of different ideas for a forest scene very quickly.
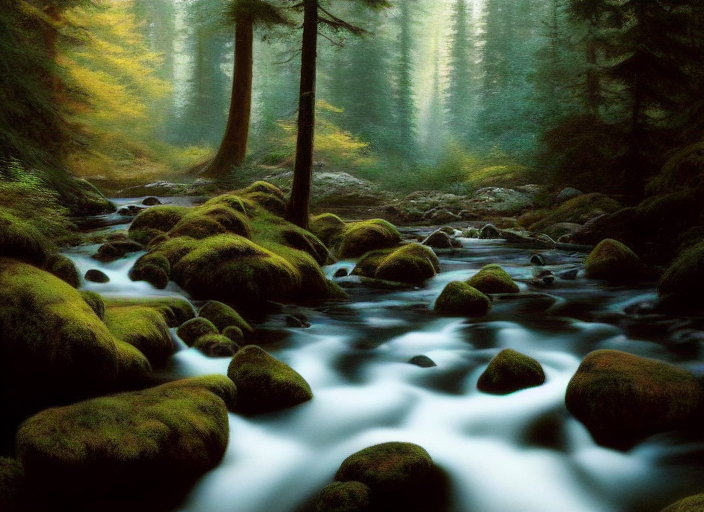
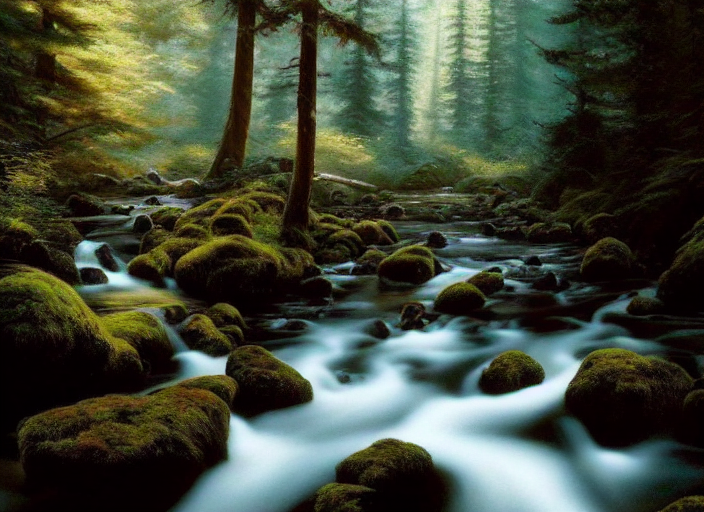
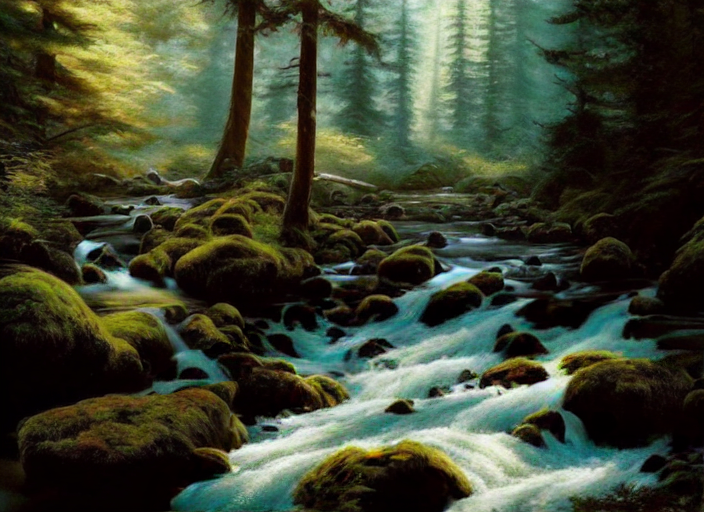
Since the story is about the water cycle, it’s important for the stream to be depicted well. In the generated image below, the stream has motion blur. That style would be appropriate for a long-exposure photograph, but not for a digital oil painting. However, I do like the way the trees and rocks came out, so I only want to change the stream. Hence, it makes sense to use In-Painting!
Step 3: Getting Started with InPainting
With the Stable Diffusion Web UI open in your browser, click on the img2img tab in the upper left corner. Then click the smaller Inpaint subtab below the prompt fields.
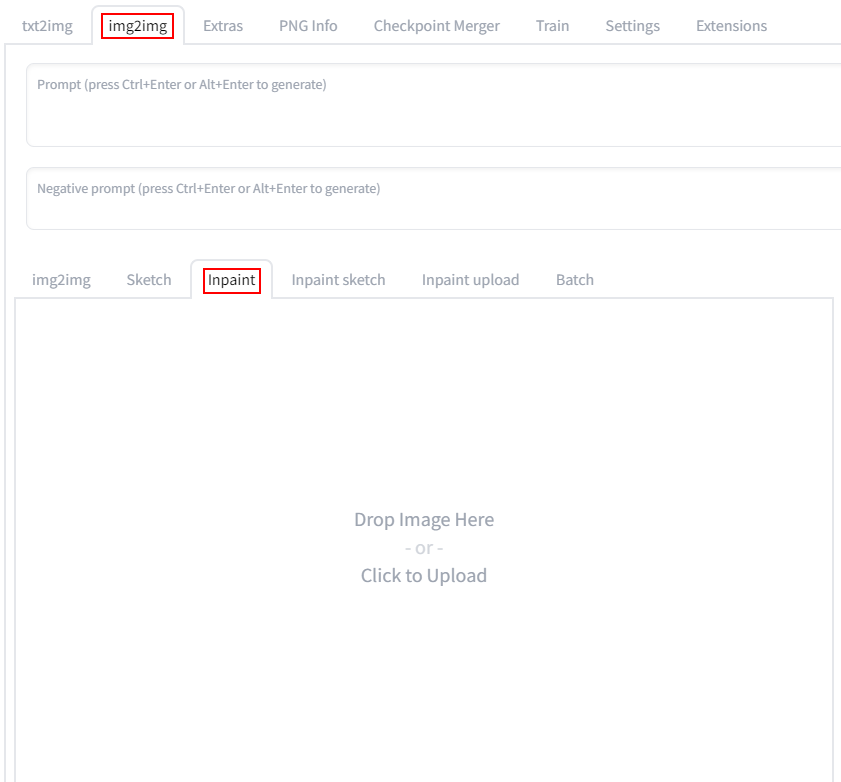
From here, you can drag and drop your input image into the center area, or you can click and a pop-up will appear that will allow you to navigate to a directory on your platform so you can upload your input image.
Prompt: In this field, type in a broad description of your entire image, but provide very specific detail about what you want to inpaint.
Negative Prompt: In this field, type in keywords that describe everything that you do NOT want in your image. This step is optional.
Now it’s time to start painting the area you want to alter in your image (or not; see the next section about Mask mode). When you hover your mouse over the image, you’ll see it becomes a black circular brush. Click and hold on the painting and you will start coloring in areas with solid black. This is called a mask, and everything in the image under the mask is what Stable Diffusion will Inpaint (assuming the “inpaint masked” option is selected). The mask does not have to be a single continuous area.
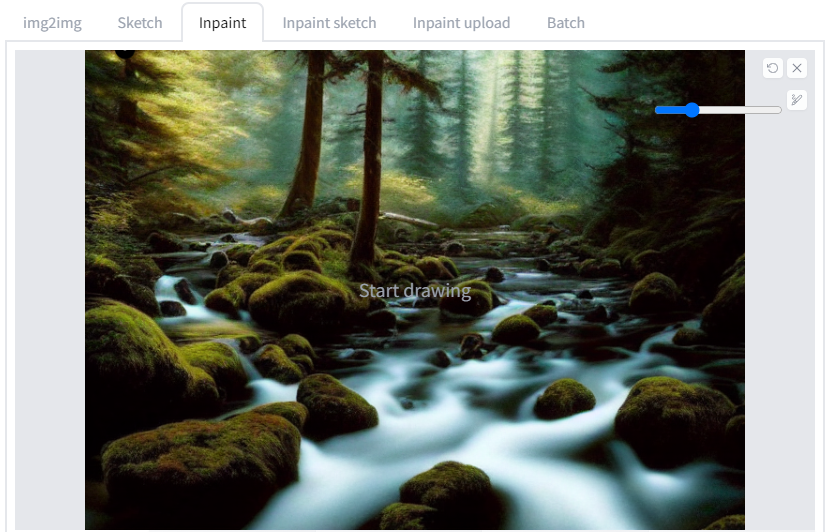
In the upper right corner of the Inpaint subtab, you will see three small buttons:
- Undo button: This will undo the the last masking action that you did with your brush. You can hit this brush repeatedly until your entire mask is gone.
- X button: Erases the entire mask you made in one fell swoop.
- Brush button: This will bring up a slider that will let you adjust the size of your brush. Moving the slider to the left will make the brush smaller and moving the slider to the right will make the brush larger.
If you’ve added an input image, written a text prompt and masked off the area(s) of your input image, then technically you have done everything that is required to inpaint and can just hit the Generate button. However, if you want more control over your output or want to do more advanced inpainting, then you will want to get acquainted with the inpainting parameters.
Step 4: Understand the Stable Diffusion InPaint Settings and Parameters
In the Stable Diffusion Web UI, the parameters for inpainting will look like this:
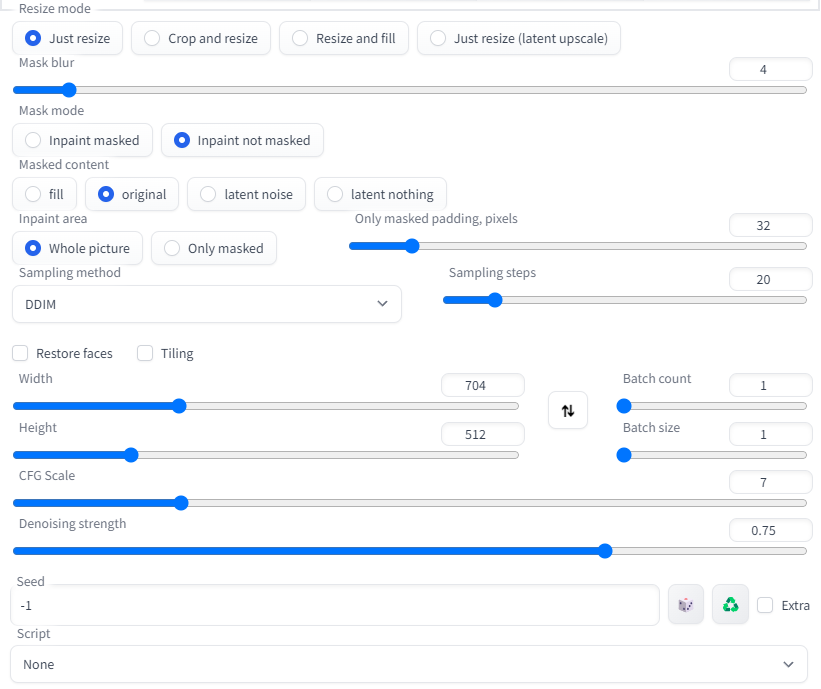
The first set of options is Resize Mode. If your input and output images are the same dimensions, then you can leave this set to default, which is “Just Resize”. If your starting image is a different size or ratio from the one you want to end up with, then you may want to change this to one of the other options:
- Just resize: This is the default selected option. Stable Diffusion will scale images to the width and height you specify further down the page. This action is similar to a Transform action in an image editor, and can result in a lot of distortion in your image if your output aspect ratio is significantly different from your input aspect ratio.
- Crop and resize: If you specify dimensions for your output image that are smaller than your input image, then Stable Diffusion will crop the edges to fit. If you specify dimensions for your output image that are bigger than your input image, then it will resize the image with a 1:1 ratio to fit those dimensions, then crop off any edges that exceed those dimensions
- Resize and fill: You would use this option if you want your output image to be taller or wider than your input image. Under most circumstances, I would not recommend using this option, because it can introduce a lot of weird looking distortion along the edges that you grew. However, it can be used as a quick-and-dirty method of out-painting in combination with the “Inpaint not masked” option, which is described further down in the guide.
- Just resize (latent upscale): This is the same as Just Resize but without using one of Stable Diffusion’s upscale models. In my experience this option is not very reliable, and in 99% of cases you should use the first Just Resize option instead.
Mask blur is kind of like selection feathering in standard image editors, meaning that Stable Diffusion will add a soft blur to the edges of the areas you in-paint. This helps blend your in-painted areas with the surrounding image. A smaller mask blur means there will be a harder “edge” to your in-painted areas. The default value is 4, but you may want to adjust this scale depending on the size of your image, the size of the area you’re in-painting and the subject matter of your image.
Mask mode has two options:
- Inpaint masked means that the areas you paint black will be re-generated by Stable Diffusion
- Inpaint not masked means that the areas you do NOT paint black will be re-generated by Stable Diffusion
Masked content dictates the starting content for the areas you are inpainting
- Fill: The InPaint result will be generated off of an extremely blurred version of the input image.
- Original: The result will be generated based on the original content of the designated sections of the image to be altered. This is what you will want most of the time.
- Latent Noise: This option is good to select if you want the inpainted output to be very different from the original image, since the designated area will be inpainted based off of noise produced from the seed number. Basically this is starting from a blank slate.
- Latent Nothing: In this option, Stable Diffusion will fill in the designated area with a single solid color that is a blend of the colors from the surrounding pixels. This option is good to select if you want the InPaint to be extremely different from the original image but still maintain a vestige of its color palette.
Inpaint area has two options:
- Whole picture: This is the default option. Stable Diffusion will generate new output images based on the entire input image, then blend those output images into the designated inpaint area based on the amount of mask blur you specified.
- Only masked: If you select this option, Stable Diffusion will upscale just the areas you designated to the width and height you set, generate based on that, then downscale those back to the original size and combine them into the output image. If the area you’re inpainting is very small in proportion to the entire image, this is a great option to select because sometimes Stable Diffusion’s inpaint will fail and return no change to the output otherwise. If you select this option, then you should also designate how much only masked padding in pixels you want. Your output will look more like the input the higher the masked padding value you set.
Sampling Method: The default sampler in Stable Diffusion Web UI as of writing is Euler A. An entire article and guide can be written about different sampling methods, their advantages and disadvantages and how they effect image quality and their recommended Sampling Step and CFG values, which is well beyond the scope of this tutorial. For the particular example I am using with the forest, I chose to use DDIM.
Sampling Steps: For this tutorial you can think of sampling steps as the number of iterations that Stable Diffusion runs to go from random noise to a recognizable image based on the text prompt. The default value is 20. As a general rule of thumb, the higher the sample steps, the more detail you will add to your image, at the cost of longer processing time. The truth of that statement can vary depending on the sampling method you choose, and for some sampling methods, image quality will actually decrease if you set the sampling steps too high. To learn more, you can check out my article on how to optimize sampling steps.
Restore Faces: If you have a person or creature with a human-like face, you should check this box, as it will greatly improve the quality of faces in your output images.
Tiling: This setting applies more to txt2img and img2img, and can almost always be ignored for inpainting. This setting tells Stable Diffusion that you want the edges of your output images to match one another so that you can tile them into a repeating grid pattern.
Batch count and Batch size: Batch count is the number of images that Stable Diffusion will run in sequential order. Batch size is how many images you want Stable Diffusion to run in parallel. Processing images in parallel can be faster, but uses a lot more memory. You may need to play around with what works best for your GPU. Practically this is how these settings interplay with each other:
- If you set Batch count to 8 and Batch size to 1, then Stable Diffusion will generate 8 images one after another.
- If you set Batch count to 1 and Batch size to 8, then Stable Diffusion will generate 8 images simultaneously.
- If you set Batch count to 2 and Batch size to 4, then Stable Diffusion will generate 4 images simultaneously and then after that it will generate another 4 images simultaneously for a total of 8 output images.
CFG Scale: This stands for Classifier Free Guidance scale, and it is the setting that controls how closely Stable Diffusion should follow your text prompt. The higher the value, the more strictly it will follow your prompt. The default value is 7, which gives a good balance between creative freedom and following your direction. A value of 1 will give Stable Diffusion almost complete freedom, whereas values above 15 are quite restrictive. Find out more about how CFG Scale effects image quality and how to optimize CFG.
Denoising strength: This setting controls how closely Stable Diffusion will follow your input image. A denoising strength of 0 will mean the output image will look exactly like the input image. A setting of 1.0 will get you an output that looks nothing like the input. The default setting is 0.75. To visualize how this value affects your output images, you can check out my article on Denoising Strength.
Seed: To briefly summarize, they help to maintain consistency across multiple user sessions and image generations, provided you do not significantly change the prompt or parameters by too much, and that your output width and height are the same as the image you originally generated with the seed. The default setting for the seed is -1, which means Stable Diffusion will randomly select a seed for your generation. You can import the seed used in the last generation by clicking the button with the green recycling symbol. You can also type in a specific seed number if you know of one. For more info, I have a detailed tutorial explaining what seeds are and how to use them.
Scripts: This drop down menu is for more advanced options to do things such as out-painting that are well beyond the scope of this guide. For most applications using inpainting, this menu can be ignored and set to None.
Conclusion
With all of the above, you should now have all of the information you need to start using InPaint in Stable Diffusion! To continue with our specific example of Inpainting an image for our original short story, One Drop in the Ocean, you can see the black mask I created using the brush tool in the center image below. The right image is the output, and you can see that Stable Diffusion added significantly more detail to this area and made it look more like a digital oil painting from the original.
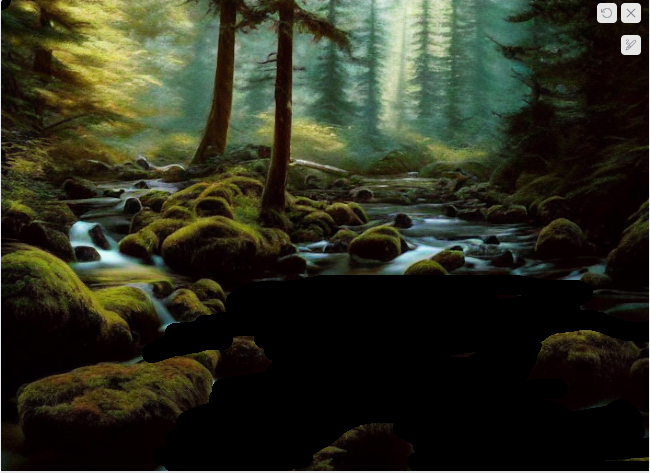
As you can see, InPaint is an extremely powerful and versatile tool for making adjustments to specific areas of an image in Stable Diffusion without having to use a third party image editor. Go forth and have fun!

