If you want to take your AI image generation to the next level in Stable Diffusion to consistently get the same style across many images with different subjects, then training an embedding is worth your while. There are a few situations in which this could be helpful:
- You are yourself an artist, and you want to be able to generate images quickly in your own style for various personal and creative reasons
- You have a specific object, person or face that you want to incorporate into your AI generated images
- You want to create a new artistic style by blending the characteristics of many artists together, or emulate a specific artist. Be aware that this path has a lot of controversial moral and legal debate around it!
This tutorial uses screenshots from Stable Diffusion Automatic 1111 v1.5 Web UI under RunPod.io
What is an Embedding?
The embedding layer encodes inputs such as text prompts into low-dimensional vectors that map features of an object. These vectors guide the Stable Diffusion model to produce images to match the user’s input.
Training a custom embedding uses textual inversion, which finds a descriptive prompt for the model and then creates images similar to the training data the user provides. The underlying Stable Diffusion model stays unchanged, and you can only get things that the model already is capable of.
Training an Embedding vs Hypernetwork
The hypernetwork is a layer that helps Stable Diffusion learn based on images it has previously generated, allowing it to improve and become more accurate with use. Unlike an embedding, training the hypernetwork will actually change the model.
If you want your model to only ever show the exact same training object or person, then a hypernetwork may be better for your application. However if you want more flexibility and are going more for a general style, then an embedding works may work best.
This tutorial will specifically focus on training an embedding in Stable Diffusion.
Step 1: Gather Your Training Images
The general recommendation is to have about 20 to 50 training images of the subject you wish to train an embedding in Stable Diffusion. In my personal experience, training an artistic style generally works best with at least 30 example images that has a good balance between variety and overlap of subject matter.
While there isn’t an exact science to selecting training images for specific objects, here is a rough guideline:
- 5+ images at different angles of the entire object, person or animal
- 5+ images at different angles of half body shots
- 10+ images at different angles and expressions of the subject’s face if you are doing a person
I have also found the greatest success with using 512 x 512 training images. You can either prepare these manually yourself using an image editor like GIMP or Photoshop, or you can use the Pre-Process Images tab within Stable Diffusion to do this for you, which is described in the next step. Either way, I would advise doing a little manual work up front and cropping images down to a 1:1 ratio so that features you care about on the subject do not get cropped during the automated pre-processing step, which may not work the way you want it.
Step 2: Pre-Processing Your Images
Once you have your images collected together, go into the JupyterLab of Stable Diffusion and create a folder with a relevant name of your choosing under the /workspace/ folder. Put all of your training images in this folder.
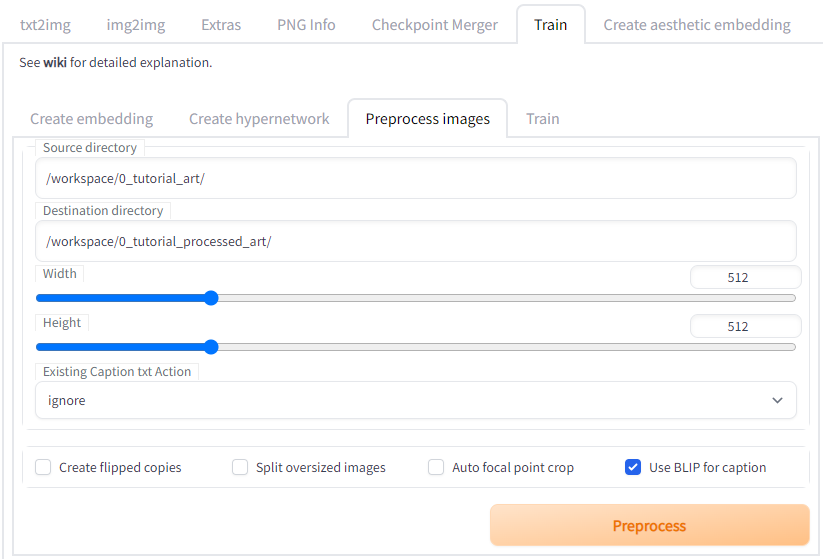
A) Under the Stable Diffusion HTTP WebUI, go to the Train tab and then the Preprocess Images sub tab.
B) Under the Source directory, type in “/workspace/” followed by the name of the folder you placed or uploaded your training images. For this tutorial we used “0_tutorial_art”
C) Under Destination directory, type in “/workspace/” followed by the name of the folder that you want Stable Diffusion to create which will contain the processed images and captions.
D) For Width and Height, I generally leave it at 512 x 512 because that is the size of the images that I tend to create. You can change these values to better fit your training images and the size of images you want to generate, although I typically just use the Stable Diffusion up-scaler if I want something bigger.
E) For the Existing Caption txt Action drop down menu, if you are like me and most other people, you have not already generated *.TXT files containing text captions describing each training image. In that case, select ignore. If you do have caption files already created, then you can choose to either append, prepend or copy them.
F) If you selected ignore under the Existing Caption txt Action, then you will need to check the Use BLIP for caption option. This is how you tell Stable Diffusion to automatically generate the image caption files for you.
G) If your training images do not all match the Width and Height that you set, then you will need to decide how you want Stable Diffusion to process the images. There are a few options:
- Select nothing. If the images did not conform to a 1:1 height to width ratio, they will be cropped down to their geometric center into squares and resized.
- If you check the Split oversized images option, then SD will split the image when possible. The split image threshold determines who wide or tall the training image must be for it to be split. The split image overlap ratio determines how much the resultant images are allowed to overlap with each other.
- If you check the Auto focal point crop, then SD will crop the images down to a 1:1 ratio around the features it determines is the focus of the image. I’ve had rather mixed results with this, especially if the image is busy or if there are multiple potential focal points. In general it seems to work best if you are trying to train an embedding for a specific person and their face. There is a debug image option you can use to help figure out what the best weights work for your application.


H) Finally, if you don’t have very many training images (less than 20), you can check the Create flipped copies box to have Stable Diffusion horizontally mirror your training images and effectively double your training data set. However, do NOT check this option if you are training the embedding on a person! This is because people and faces in general are not perfectly symmetrical, and the likeness you get from your embedding will not resemble them if you create flipped copies of them.
I) Once you have all the settings you want, hit the Preprocess button and wait for Stable Diffusion to finish.
J) Go to the Destination directory to check that SD created the preprocessed images to your specifications and that BLIP created the accompanying *.txt files containing the captions.
K) Go through the *.txt files and confirm the captions are accurate! They were automatically generated after all, and unfortunately, sometimes Stable Diffusion really gets it wrong. I often manually update the captions to more accurately describe my training images. Making sure the captions are correct will drastically improve the quality of your embedding and make it more likely to give you output images that match your text prompts when using it in the future.
Step 3: Create Your Embedding
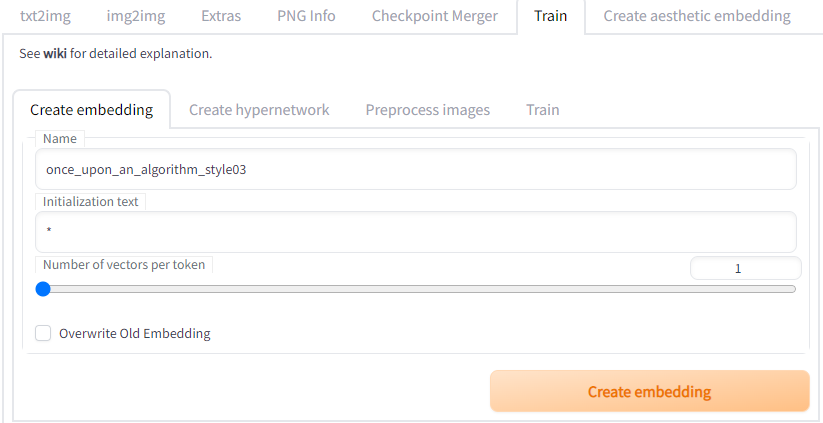
Now go under the Create embedding sub tab under the Train tab.
A) Pick a distinctive Name for your embedding file. For the purposes of this tutorial, I called it “once_upon_an_algorithm_style003”, but you do you.
B) The default for Initialization text is “*”. You should delete the asterisk and write in a word or phrase that describes the subject or artistic style that you are trying to train the model in. This will tell Stable Diffusion what vectors to initially populate the embedding with, and it is also the keyword or key phrase you write in your text prompts to trigger use of the embedding.
C) The Numbers of vectors per token determines how much data your embedding stores. Generally a setting of 1 is sufficient for training faces or objects. Note that the higher the number of vectors, the more training images you should provide and the longer it will take to train the embedding!
When you are ready, hit the Create embedding button. Once Stable Diffusion is done, it will create a *.pt file with the name you specified under the embeddings folder.
Step 4: Write a Text Prompt To Test Your Embedding
Go to the txt2img tab. Type in the same text prompt, negative prompt and model settings you would want to use with your new custom embedding. This is how you will judge whether your embedding has been trained sufficiently.
Step 5: Train Your Embedding
We’re almost there! Now that you have your preprocessed training images, captions and embedding file created, it’s finally time to train your embedding in Stable Diffusion! You do this under the Train sub tab under the Train menu.
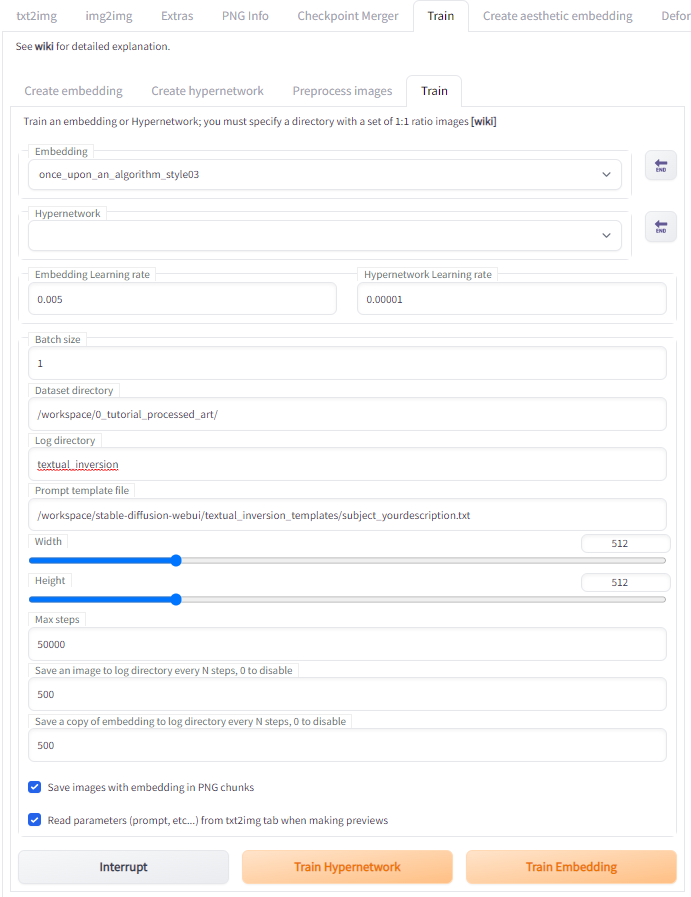
A) Select your embedding file in the Embedding drop down menu.
B) The default Embedding Learning Rate is 0.005 and this is about as high as I would go if you selected a vector value of 1 in Step 3. In theory, the higher this value, the faster the embedding will learn, but anecdotally this speed may come at the cost of quality and subject accuracy.
C) Set the Batch size to the number of images you want the embedding to generate using the text prompt you wrote in Step 4.
D) Set the Dataset directory to the folder that you created in Step 2 that contains your preprocessed images and caption files.
E) To set the Prompt template file, first go to /workspace/stable-diffusion-webui/textual_inversion_templates/ (or your Stable Diffusion installation’s equivalent). Check to see what template files are there. Among the files in that directory should be one called style_filewords.txt and one called subject_filewords.txt. Once you have confirmed they exist, under the WebUI, make sure this field is pointing to that directory and select style_filewords.txt if you are training an artistic style or select subject_filewords.txt if you are training an object, person or animal.
F) Set the Width and Height of the output images you want.
G) The default Max steps is 100,000. Personally I have found that the training quality does not seem to significantly improve past 50,000 steps for artistic styles. You can also always interrupt the training before it hits this number.
H) The default Save an image to log directory every N steps and Save a copy of embedding to log directory every N steps is 500, and I usually keep it to this number. If you kept it on default, Stable Diffusion will generate images using your embedding every 500 steps, and also save a version of your embedding every 500 steps. Sometimes this is nice because on rare occasions, embeddings may actually get less accurate to your subject the more you train it, so having a visual representation of the embeddings’ capabilities every 500 steps lets you determine if and when this happens, and then allows you to get the version of the embedding right before it went off the deep end.
I) Make sure to check the Read parameters (prompt, etc…) from txt2img tab when making previews box!!! This tells Stable Diffusion to use the text prompts you typed in during Step 4.
J) Time to train! Hit the Train Embedding button. Remember you can always hit the Interrupt button at any time. You can check how your embedding is doing throughout the training by looking at the images being saved in the log directory in the textural inversion folder.
Step 6: Using Your Embedding
When you are satisfied with training your embedding in Stable Diffusion, using it is easy. Whenever you want to use it, make sure the *.pt file is located under the …/stable-diffusion-webui/embeddings/ folder. Then when you write a text prompt, call out the name of your embedding file. All done!
