Although Stable Diffusion is completely free and open source, there are still quite a few barriers to get it yourself. Sure you can get nicely packaged Stable Diffusion based apps such as MidJourney or use online-only text to image generators like Lexica, but you’re here because you want to take the next step and have significantly more control over your images and have access to all of Stable Diffusion’s features. This article will tell you how to get Stable Diffusion, without all the hassle of downloading and installing it onto your own computer.
Why Getting and Running Stable Diffusion Yourself Can Be Annoying
If you’re reading, this, you probably have many of the same concerns that I had when I first started my AI image generation journey:
- Your computer does not have a fast CPU or GPU. While I own a gaming laptop that was top of the line 2 years ago, it can still struggle when running Stable Diffusion on it, and I like the ability to do other work while images are generated in the background.
- You want more tools and control than pre-packaged generators allow. As of writing, Lexica and MidJourney can only really generate images off of text prompts, and lack basic controls such as in-painting or image-to-image. If you don’t know what I’m talking about, then you can learn about these powerful tools in Stable Diffusion in my tutorial on in-painting and img2img generation.
- Stable Diffusion is evolving so fast you can’t keep up. AI technology is changing incredibly rapidly, with new versions and models getting posted constantly. With so many different users and communities working on and experimenting with it, updates are frequently posted in different forums and servers and it’s hard to keep track of it all. Tutorials on how to install it are frequently wrong and out of date, and with the possibility of data corruption and bugs, it’s also hard to know what sources to trust.
- I don’t know how to program or code. Honestly, you really don’t need to know how to code to use Stable Diffusion, but to first time users, tools like Github or Terminal can look and feel quite intimidating, and many of the tutorials out there for how to download and install Stable Diffusion often assume a basic familiarity with Python.
All of these reasons are valid and can be a big reason why fewer people have tried AI image generators, or have been unwilling to take the plunge beyond text to image. But fear not, because there is a solution!
Advantages of Running Stable Diffusion on RunPod.io
At this point, I’ve tried quite a few variations of running Stable Diffusion on my own local hardware as well as running it on service platforms, and as of time of writing, the hands-down winner for hassle free Stable Diffusion use is RunPod.io. It’s a service that lets you rent GPU instances online at extremely competitive prices and is integrated with cloud storage services like DropBox and Google Drive. You can see my comparison on RunPod.io vs AWS for running Stable Diffusion, but here are some of the major advantages of using this service:
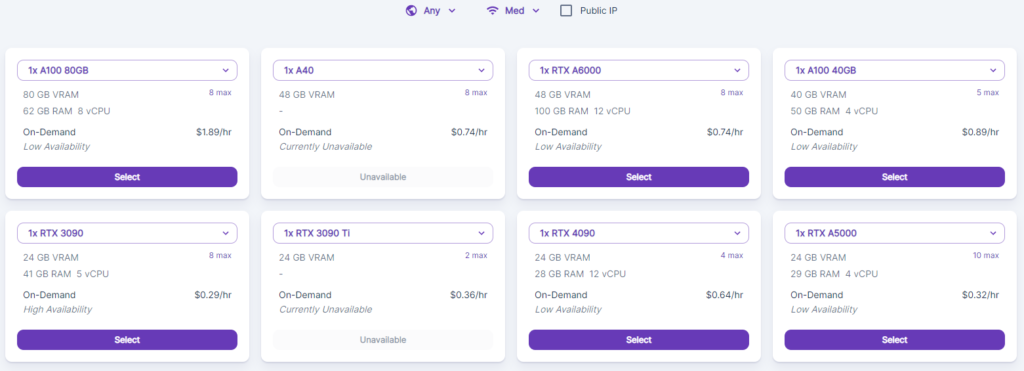
- It’s inexpensive. For example, you can rent a pod with an NVIDIA GeForce RTX 3090 with 24GB of VRAM for only $0.29/hour, or if you really need that extra boost, you can get an NVIDIA A100 with 80GB of VRAM for $1.89/hour (pricing as of March 2023). However, that’s just for running the GPU. For the RTX 3090, the exited disk cost is only $0.01/hour and the running disk cost is $0.006/hour.

- You can filter by location and internet speed. Of course, GPU isn’t the only factor that affects the speed of running Stable Diffusion. Luckily in RunPod, you can filter available pods by Medium (40Mb/s+), High (100Mb/s+) and Extreme (400Mb/s+) and by country. The list at time of writing is the United States, Canada, France, Netherlands, Norway, Portugal, Romania, Sweden, Slovakia and South Africa.
- You don’t have to install base Stable Diffusion yourself. As of writing, RunPod has both Stable Diffusion Automatic1111 v1.5 and v2.1 available as templates that can be deployed by simply selecting them from a drop down menu and deploying your pod. Once it is deployed, simply hit the Connect Button and select the option to enter the HTTP Port to access the Stable Diffusion Web UI.

- You can add additional features or models. In addition to the WebUI, RunPod.io also allows you to connect to the Jupyter Lab. If you run SD on your computer, this would exist as a directory on your hard drive, and it is where training images, model and embedding files are organized. Between the Jupyter Lab and the Web UI, you can fully access advanced capabilities such as training your own custom embedding to teach Stable Diffuion a specific artistic style or learn an object or face.
Conclusion
By now you are hopefully convinced to get Stable Diffusion by running it on RunPod.io. I have certainly become significantly more productive since using it, as it has completely eliminated my need to keep up with the latest installation protocols for the various versions, and allows me to use my computer hardware to do other tasks while RunPod generates images in bulk in the background. Give it a try, and happy generating!


